
it's time again for the Weekly Budding Designers Tip!!
 since i first embarked on this journey, i've learned a lot about the design process, the tips and tricks of the trade . this weekly segment is my way of giving back and helping out other budding designers like myself by sharing my knowledge.
this weeks tip will be part one of 2 tutorials about making your own charts. we'll be talking about making Lace and Illusion charts with help from Chez Plum.
Lace Charts:
if you click on the link above you'll be redirected to the tutorial page over at Chez Plum. Sylvie has already done an amazing job of showing you exactly how she uses Excell (or a similar program) to make lace charts, so there's no need for me to try to reiterate it here. if you're a Lace designer i urge you to follow the link above and check out her tutorial. i'm going to start my tutorial series with Illusion charts, and next week we'll move on to Cable charts.
Illusion Charts:
if you've been following my blog then you'll know that i've dabbled quite a bit in Illusion design. up until very recently i have been writing all my illusions patterns out without the use of a chart. but then i found the Chez Plum tutorial for making Lace charts and i thought to myself "maybe i can modify this technique to make illusion charts." and that's just what i did.
here's how i did it:
- we'll start off by opening Excell or Open Office, or any similar spreadsheet program. don't be afraid of working with spreadsheets, it's really not as difficult as you might think. for the purposes of this tutorial i'll be working with Open Office, you can click that link to download it if you don't have a spreadsheet program.
- first click the box in the upper left corner of your spreadsheet to highlight all the cells, then go to format/columns/width to decrease the width of the columns ( i decrease to about .29")

{click the box in the black oval to highlight}

{click on "Format" then go to "Columns" and "Width" and type in your new width}
- once you've adjusted the size of your cells you're ready to begin charting. you'll need 4 colors to make an illusion chart, i like to use a light and dark shade of 2 different colors but in theory you can use any colors you want.

- i like to start by highlighting the exact area i'm going to be working with and then adding a border to that area so that i don't color beyond it. the button for adding borders is just to the left of the button for coloring as shown above.
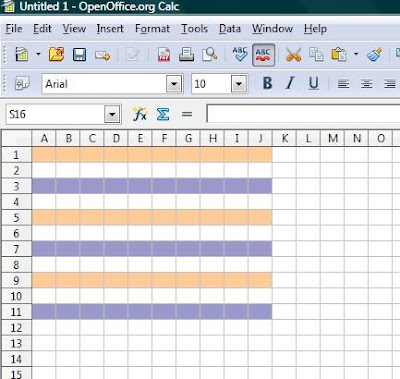
- then i color in every other row in alternating light shades as seen below
- now it's time to fill in the area for your design or pattern in the darker shades of the color:

- and then all that's left is to fill in the remaining area in the lighter colors like so:

[Quick Tip: by holding down the "Control (Ctrl)" button on your keyboard you can highlight multiple boxes at one time in different places on your chart. you can use this to select all cells that will be the same color. this will save you the time of having to fill in the cells one by one]
- finally, the last step in creating a chart is to make a legend for the chart like mine seen below:

i've taken the time to make a swatch of what this simple cross illusion chart looks like knit up.

once you're finished making your chart and legend take a screen shot of your work by pressing the "Print Screen" button on your keyboard (it's usually next to the "F12" button.) then simply paste your screenshot into a program like Microsoft Paint by holding down the "Ctrl" button and pressing "V."
now you'll be able to edit or modify your chart a bit in Paint and finally save it to your computer as a JPEG file to be inserted into your pattern.
and that's all there is to it! it may seem a bit complicated at first, but chart making really is invaluable knowledge for any budding designer to learn. it saves you money on Tech Editing, and lets you be more in control of the design process and the final pattern product.
well that's this weeks budding designers tip, i hope this will be beneficial to some of my budding designer followers out there, and any of my followers who ever wanted to know a bit more about illusion knitting or charting. tune in next week for the Cable Chart Tutorial.
~Carla
No comments:
Post a Comment